The official web home of Team J, a frabjous transmedia company.

Tag: Stonehenge Casting How-To (Page 2 of 2)

Stonehenge Casting: Make sure you’re searchable as an actor

If you’ve been following the announcements, you know that:

  1. We’ve just upgraded Stonehenge Casting to version 0.3, and
  2. That means that, if you have an actor/performer profile on the site, you’ll want to make some updates.

We’re going page by page in your profile and feature by feature. You can get the full list in the original announcement.

For this article, we want to touch on a small but important addition, making sure you’re searchable as an actor.

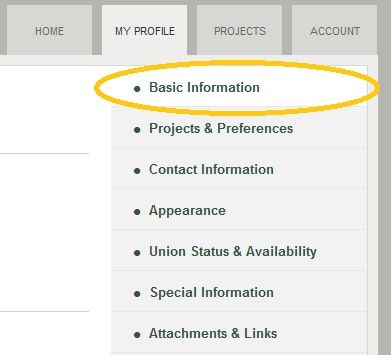
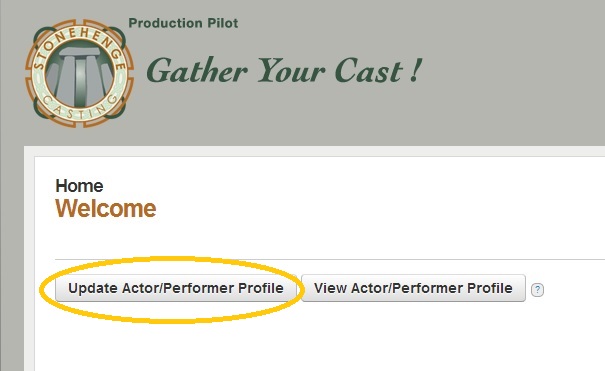
Here’s what you do. First, go to your profile:

Updating your actor profile

Updating your actor profile

From there you should be on your Basic Information page.

Actor Profile: Basic Information page

Actor Profile: Basic Information page

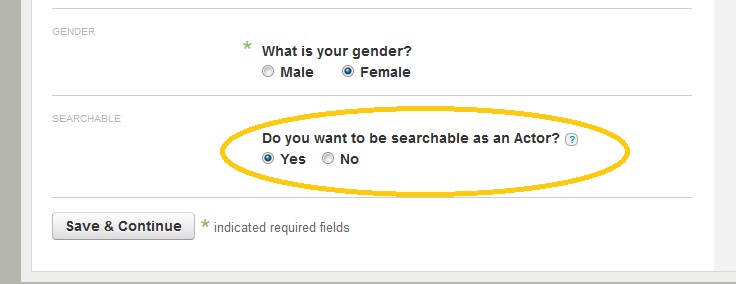
It’s relatively unchanged except for one key question you see circled in yellow below.

Actor Basic Information: New

Actor Basic Information: New “Searchable as Actor” field

For pretty much all of you, it should be defaulted to “Yes” — and if not, you’ll want to change the radio button from “No” to “Yes” and then click the “Save and Continue” button at the bottom of the page.

So why might you not want to be searchable as an actor?

For one, you may have registered on the site as a producer. Remember, any user on the site can wear multiple hats — and we do have some actor/producers — or even some producers who don’t mind making a cameo now and then. But if you don’t act regularly, this is the easiest way to make sure you don’t show up in searches.

Secondly, in future updates to the site, you’ll be able to specify additional skills. Many of you are actors and singers and dancers, for example. But not all performers act. We’ve heard from them and the employers who want to hire them — and that will become easier through Stonehenge in the coming months.

As with many of these changes, we’ll be contacting users whom we think need to make a change in their profiles.

If you want to check back at all the changes, you can refer to the original announcement about version 0.3.

If not, and if you’ve already clicked “Save and Continue,” you should have moved on to the next page, the new Projects & Preferences page.

Stonehenge Casting How-to: Uploading Headshot and Resume

We know many of you have created profiles at Stonehenge Casting.

However, for many of the profiles, we’ve noticed they’re missing the all-important headshot and resume.

Simply put: if you don’t have a headshot, casting people will ignore your profile.

In case you are one of those actors, here’s a couple tips to help you in uploading your headshot and resume onto the site.

First, make sure the file format and size are correct. Just in case you missed it on the Attachments page:

  • Headshot files need to end in .jpg, .jpeg, or .png and need to be 1mb or less (1,000k).
  • Resume files need to end in .doc, .docx, or .pdf and need to be 500k or less (0.5mb)

In addition, we are investigating a newly discovered issue when uploading a file with a long filename or with special characters — i.e. ( & _, etc.

We’re not sure if it’s either or both, but if you rename your files “headshot.jpg” or “headshot.jpeg” or “resume.pdf” as the case may be, that may do the trick. As you may have noticed, the system renames your files anyway.

(We’re looking into the exact root cause with our developers).

Second, as of version 0.3, you no longer need to upload both your headshot and resume at the same time. However, you do need to click the “Save” button for the new headshot or resume (or both) to be saved to your profile.

We hope you continue to find Stonehenge Casting useful.

Last updated: 2014-09-27

Stonehenge Casting How-to: How to Resize Your Headshot

For Stonehenge Casting, other casting sites, and even responding to casting notices by email, you’ll need to upload or send your headshot.

For that, your beautiful original headshot, perhaps 5mb or larger, simply won’t do. Resizing it should be simple (grammar police will point out it probably should be “re-size,” but they seem to have been overruled by the denizens of the internet, so we’re going with the flow).

Option A) Use whatever you use now for photos

If you’re like the vast majority of Americans, you haven’t seen a roll of actual film –much less used one– in ages. So what do you use to send the family some pictures or upload something to Facebook, etc.? Whatever you use, check and see if there’s a “resize” button or menu option. Go for 50% of the originals size OR 600 pixels or less in width. Either resulting file size should be good to upload (but hey, check the file size to be sure) .

Option B) Resize it on a PC with Paint

Okay, if you’re on this page, odds are, Option A isn’t working for you, so if you’re like most people, you have a PC with some variety of Windows. One of the built-in apps they have is called “Paint.” To resize your photo:

1) Open the “Paint” application (for Windows Vista and Windows 7 computers, click on the Windows icon in the bottom-left of your screen and type “paint” into the search box. None of us are here at Team J are hip or foolhardy enough to have a Windows 8 machine).

2) Open the image you want to resize. (You may want to be sure to make a copy of the headshot first, so you don’t overwrite your beautiful original).

3) Note the current size of the image. In Paint, you should see the width and height in pixels (e.g, “1024 x 746px”) as well as the file size (e.g., “Size: 826.1KB”) on the bottom edge of the window.

4) Click the “resize” button and a “Resize and Skew” box will pop up (located under the “Home” tab on the ribbon on the top of the application, in the second box from the left marked “image”).

5) Make sure the checkbox “Maintain Aspect Ratio” is checked (It should be checked by default, but if the checkbox isn’t checked, your re-sizing will look awful).

6) You can resize by “Percentage” or by “Pixels.” Paint usually defaults to “Percentage,” but we suggest switching to Pixels.

7) In the “Horizontal” field, replace whatever the number is with “600” (the original number is usually well over “1000”). No matter what size your original is, this usually makes the resized image small enough.

8) Click “OK” on the “Resize and Skew” box, this will bring you back to the main window.

9) Select “Save As” from the menu items and save the image with a new title such as “yourname_headshot_small” (Unless your name is, in fact, Your Name, please go ahead and put your first and last name).

10) Check the bottom edge of the window. The width and height in pixels should now be “600 x [some number]px” and the file size should be much smaller, possibly under 200KB.

11) Rejoice in the knowledge that you now have a headshot that is perfect for emailing or uploading onto web sites.

 Option C) Update it on a Mac with Preview

Let’s say you do have a Mac. One of the nifty built-in apps they have is called Preview, which is used to view photos and PDFs. You can also resize your headshot.

1) Open the Preview application (It should be on the row of apps on the bottom of your screen by default… or you can look for it in the Applications folder, you know, the folder with the non-scarlet ‘A’ on it).

2) From the top menu, select “Menu” then select “Open.” Browse and open your beautiful, original headshot.

3) Once you’ve opened said headshot, select “Tools” and the “Adjust Size” from the top menu. A window should pop up.

4) Make sure that the “scale proportionately” checkbox is checked and note the “Resulting Size” box (which presumably indicates your headshot is over 1mb)

5) Enter “600” in the “width” field. The height field should automatically be updated

6) Confirm that the resulting size in the “resulting size” box is indeed under 1mb

7) Select “Save As” from the menu items and save the image with a new title such as “yourname_headshot_small” (Unless your name is, in fact, Your Name, please go ahead and put your first and last name).

8) Rejoice in the knowledge that you now have a headshot that is perfect for emailing or uploading onto web sites. Also, you did it in slightly less steps than the PC user, but that could be our explanation.

Option D) Just Google It

If any of the options above don’t fit –or if you’re tempted to contact us for tech support– type “resize photo” or “resize image” into Google. You will get no end of search results including tutorials, software to download, and even online tools that will resize your image through your browser. We cannot recommend or guarantee any of these solutions, but it does give you plenty of options.

In conclusion…

Get help from a tech-savvy friend or relative. But remember, you and no one else is ultimately responsible for re-sizing your headshot.

(If you need some tough love as to why, feel free to read more.)
Stonehenge Casting How-to: Making Sure Your Stage Name Shows Up

As mentioned last week, we recently updated to version 0.2 of Stonehenge Casting. It’s updated a number of fields, which is good, but that does mean some of you have your Stage Name blank.

Why does this matter? Well, all the actors have their display name as their Stage Name (e.g. Screen Name).

This affects more actors than you might think about. If your full name is “Robert E. Actor” as far as the IRS is concerned, but you go by Bob Actor on your acting resume, “Bob Actor” is your stage name.

With an update we’ve made with the latest version of Stonehenge Casting (v0.2), you can correct this in less than a minute (in fact, it might take longer to read this than to do it):

  1. Log into Stonehenge Casting
  2. Go to the “My Profile” tab
  3. Click on the “Basic Information” page
  4. For the question “Is your stage/screen name different?,” select “yes.” The fields will become highlighted and blank, ready for editing.
  5. Now, for the question “Is your stage/screen name different?,” select “no.” The fields will auto-populate your legal name and become de-selected.

It’s that’s simple — and it means producers will be able to find you that much quicker.

We hope you continue to find Stonehenge Casting useful.

Newer posts »

© 2024 Team Jabberwocky

Theme by Anders NorenUp ↑